Working with Ontologies
Befitting their importance in machine learning applications, ontologies are a first-class entity in the Encord platform, with direct connections to users, organizations, and projects. The details of each relationship are explained below.
Note
DICOM customers might be more familiar with the term 'labeling protocol', which is equivalent to an Ontology.
Ontology user roles and permissions
The user who created the Ontology is granted admin privileges, which gives full control over the Ontology including adding other team members as viewers and admins. Collaborators are controlled from the 'Ontology > Settings > Team' pane.
The various actions each role can perform against an Ontology are summarized below:
| Role | Edit structure | Attach/detach from projects | View tree structure | View JSON structure | Manage collaborators | Copy | Delete |
|---|---|---|---|---|---|---|---|
| Viewer | ❌ | ✅(if project admin) | ✅ | ✅ | ❌ | ❌ | ❌ |
| Admin | ✅ | ✅(if project admin) | ✅ | ✅ | ✅ | ✅ | ✅ |
Ontologies are automatically assigned to the Organization of the user who created them, and cannot be transferred between Organizations at this time. Admin members of an Organization may add themselves as Ontology admins from the Organizations' Ontologies interface.
Ontologies and Projects
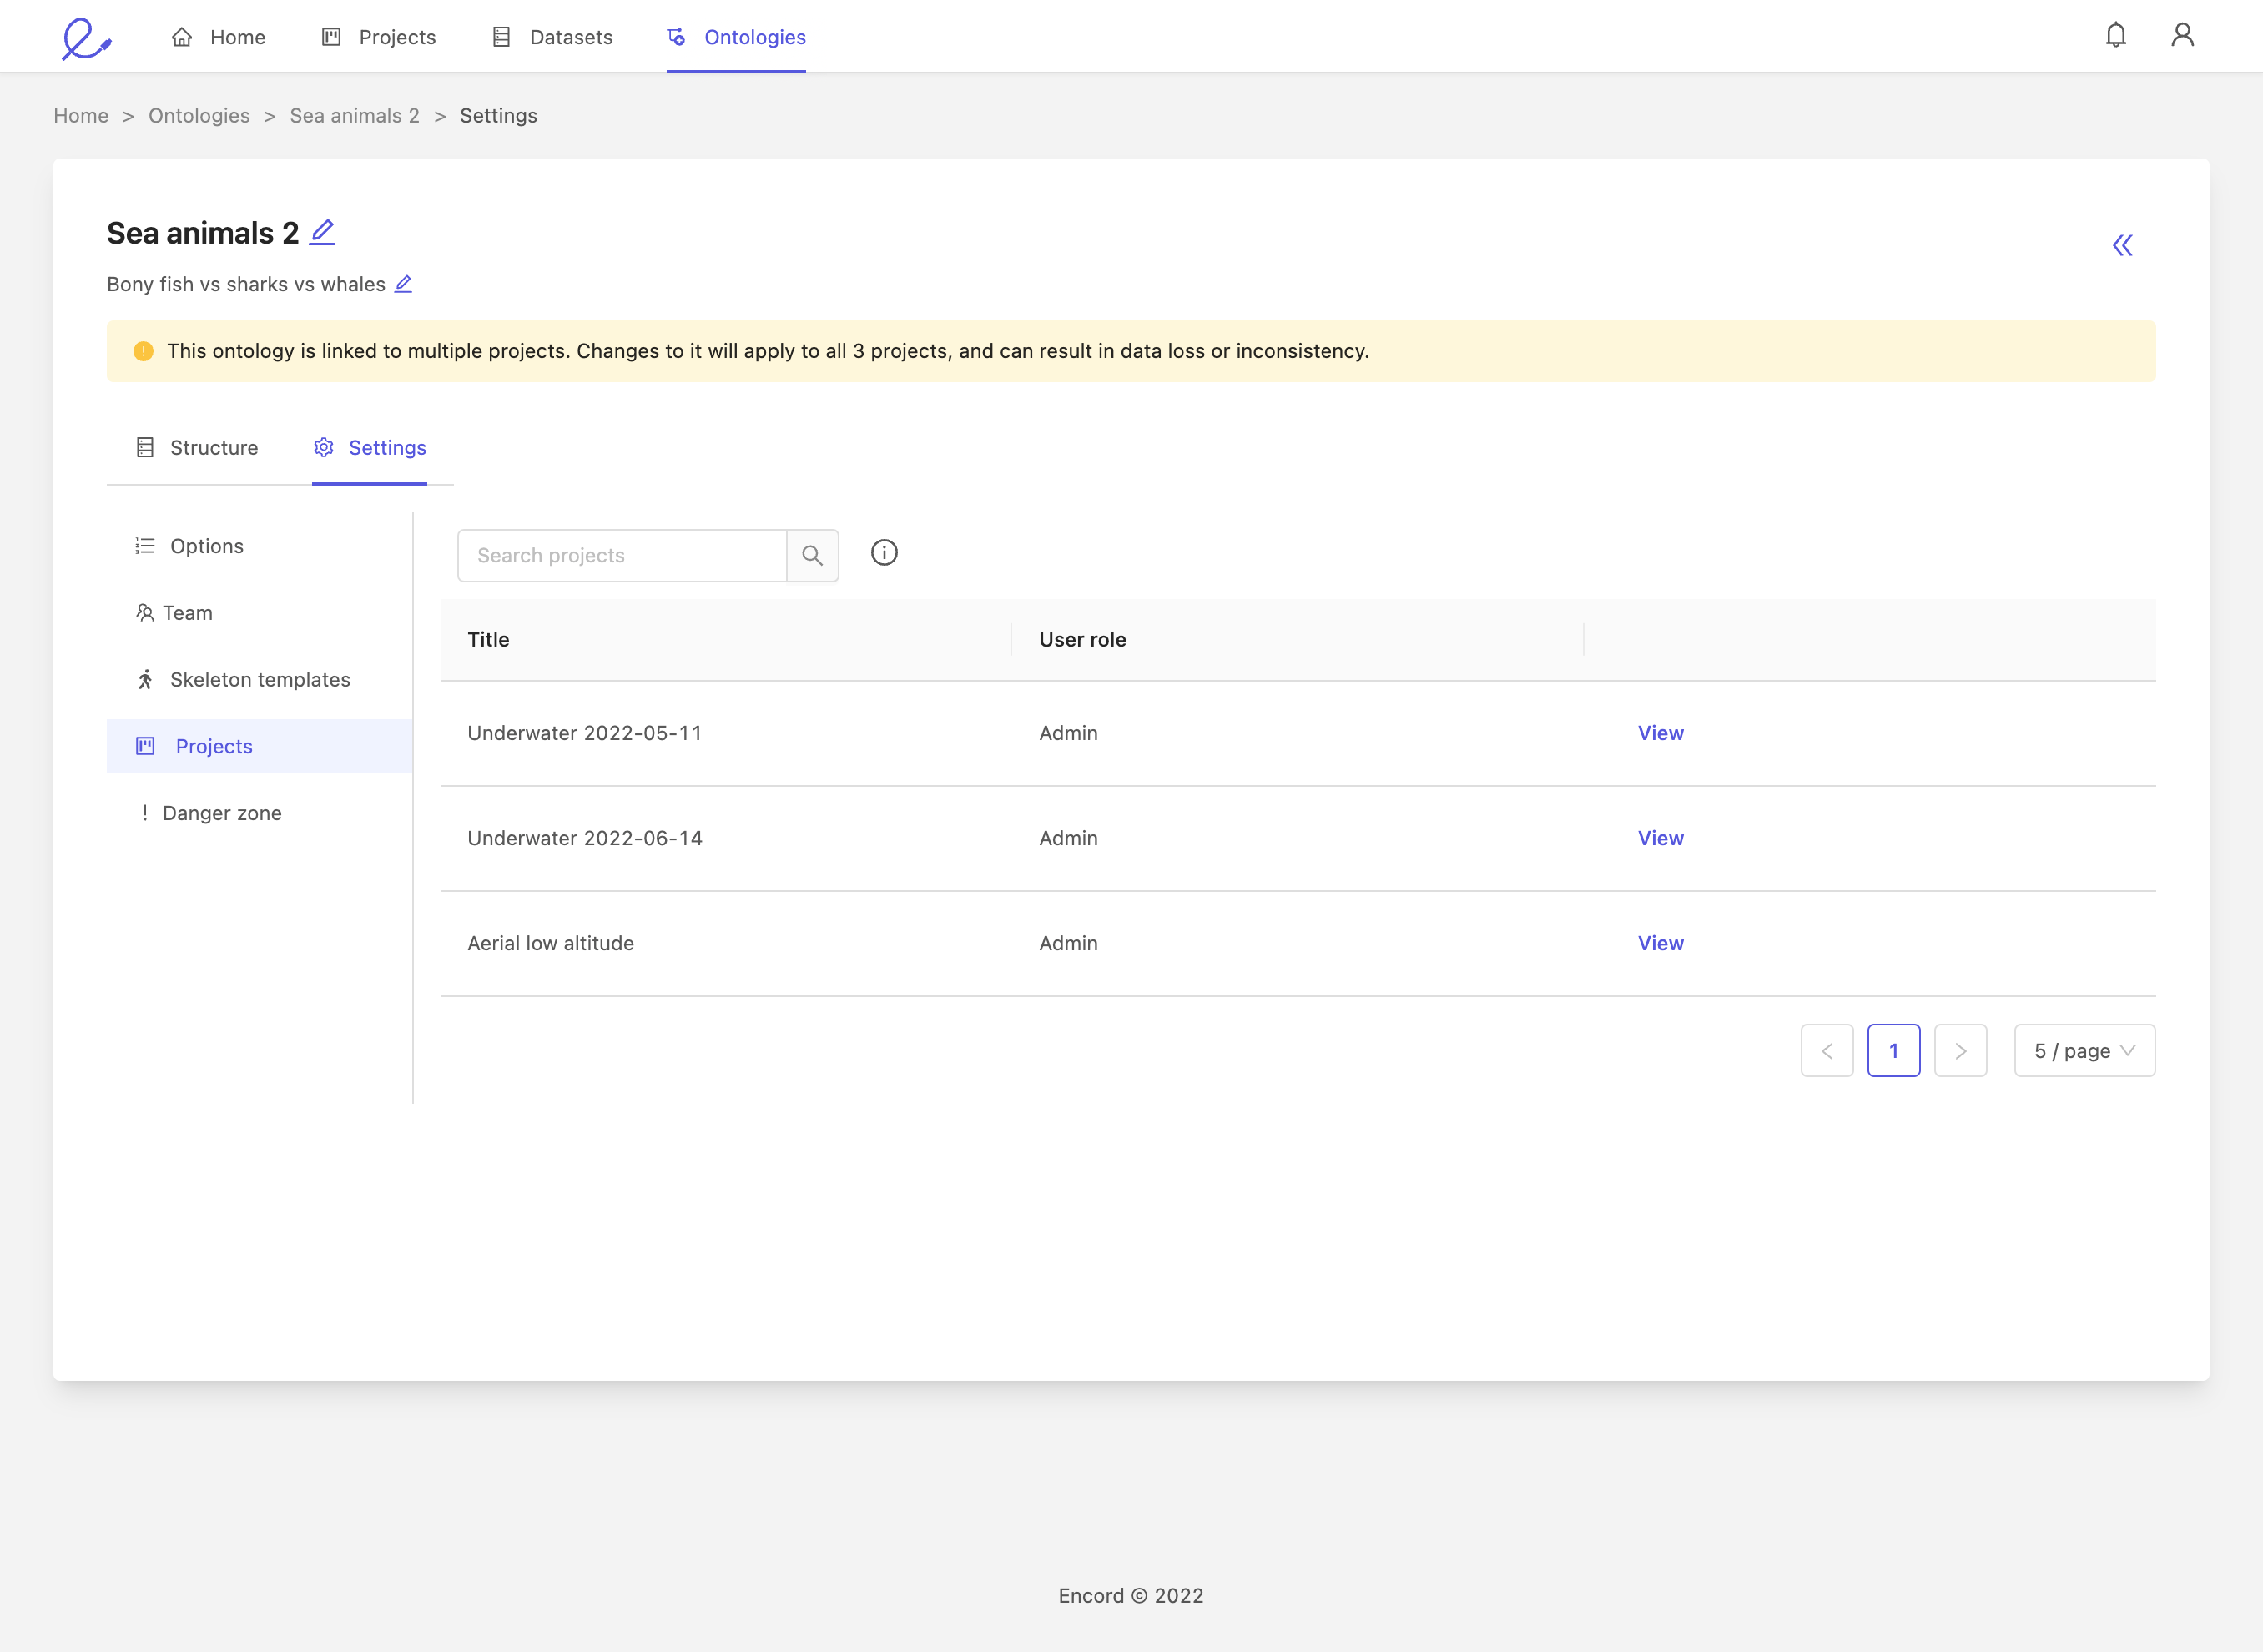
Ontologies must be attached to at least one Project and a single Ontology can be linked to multiple Projects simultaneously. Any changes to an Ontology impacts all linked Projects.
Caution
We advise against modifying Ontologies associated with Projects that already have labels associated with them. Removing parts of an Ontology leads to labels that aren't connected to an Ontology, and are therefore not valid for training machine learning algorithms.
You will see a warning label if the Ontology is used by more than a single Project. You can find the
list of the Projects using the Ontology in the Ontology's settings.
Edit Ontology
You can edit any Ontology creation. Update the structure exactly as you did during the creation process. To edit an Ontology, select it from your list of Ontologies.
A warning label appears when you edit an Ontology used by more than one Project. You can find a list of Projects using the Ontology in the Linked Projects pane of the Ontology Settings.
Caution
We advise against modifying Ontologies associated with Projects that already have labels associated with them. Removing parts of an Ontology leads to labels that aren't connected to an Ontology, and are therefore not valid for training machine learning algorithms.
Ontology settings
Select an Ontology, and navigate to the Settings tab to access the Ontology's settings.
Copy Ontologies
An Ontology can be copied in the Options page of the Ontology's settings. Click the Copy ontology button to copy the Ontology.
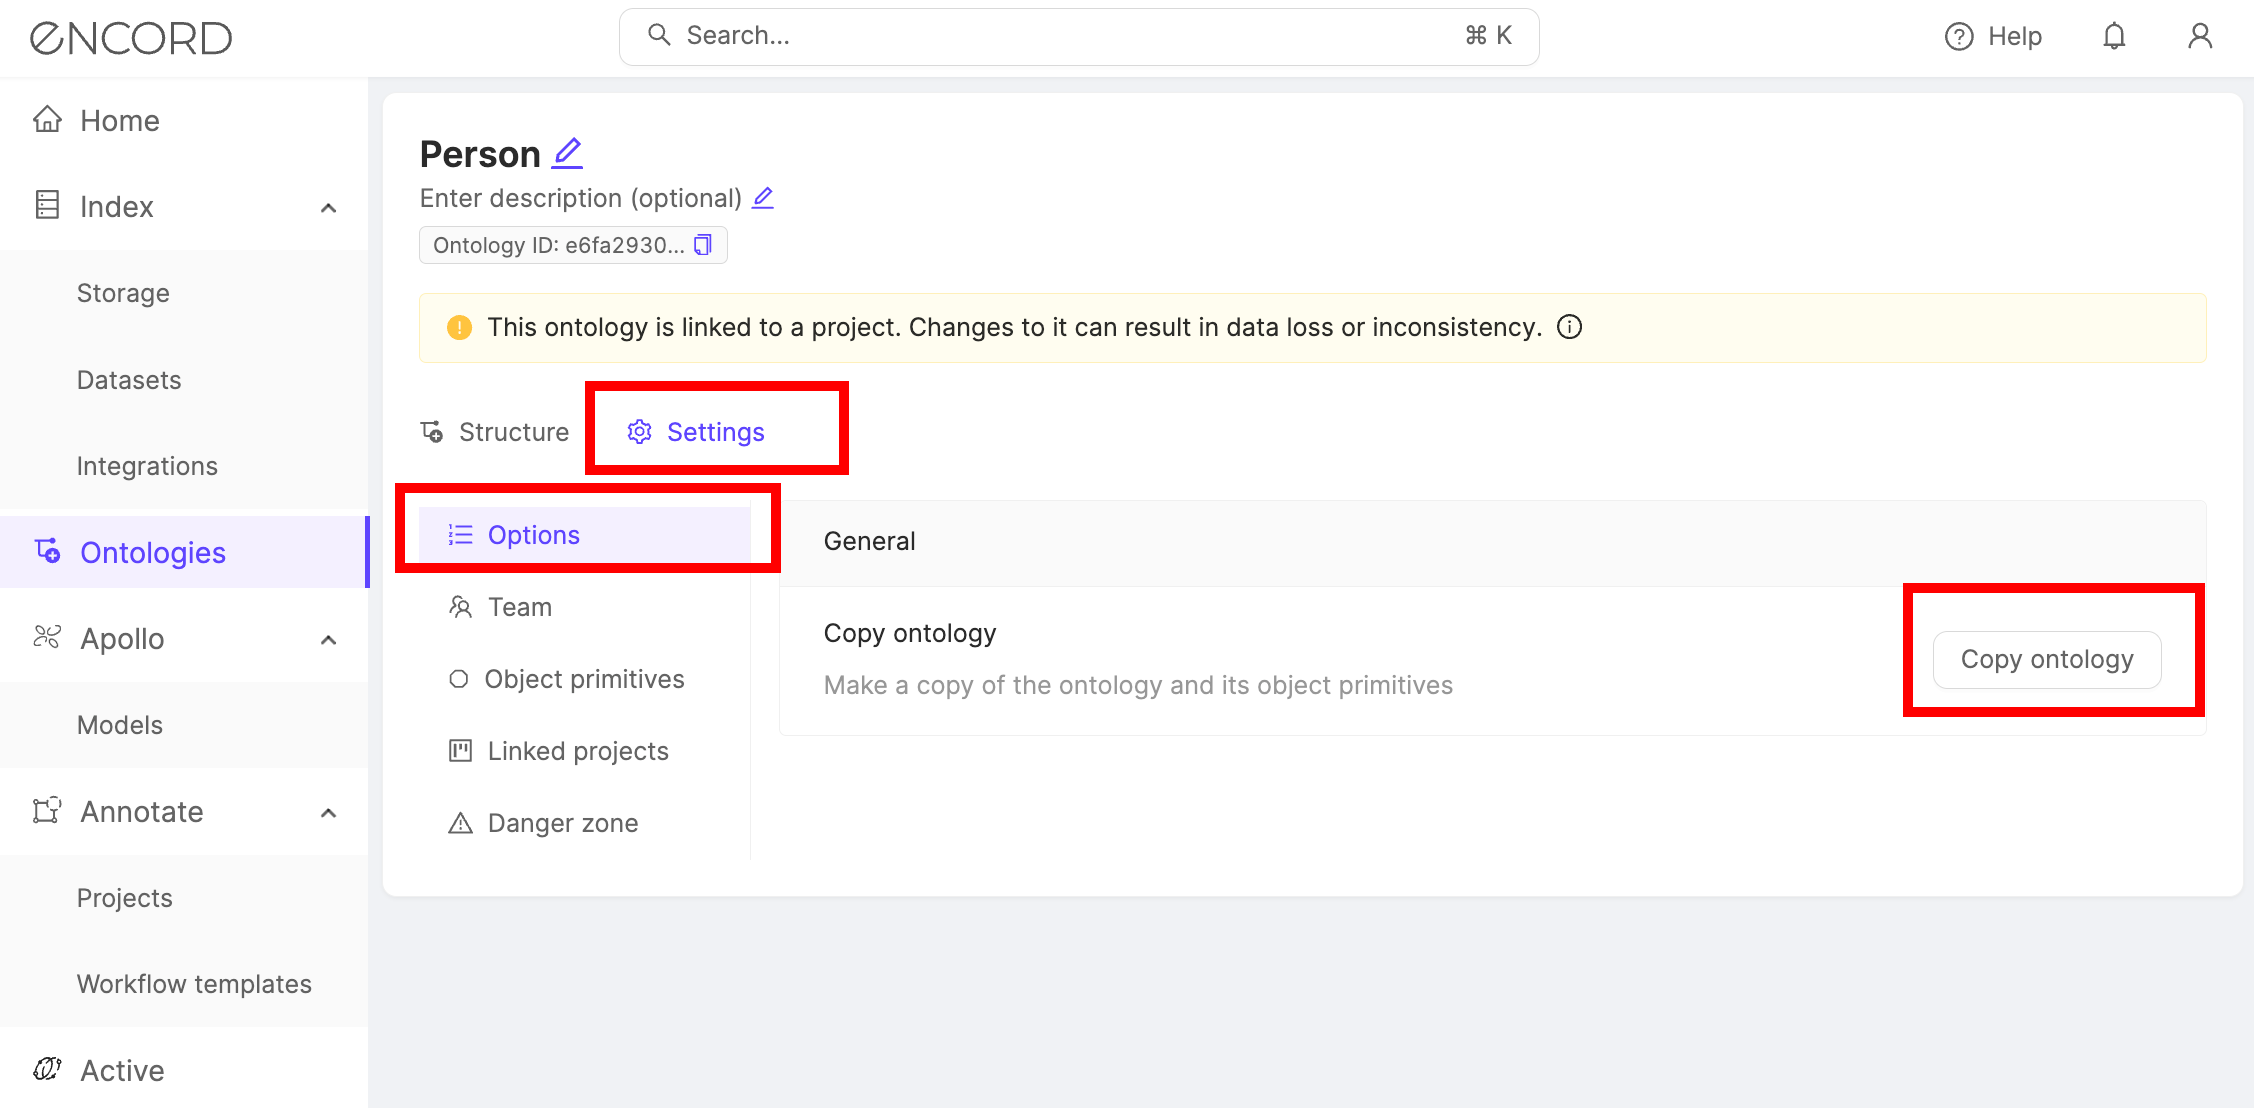
Copying an ontology copies all object primitives, and you have the option to copy any team members associated with the Ontology. The new Ontology is not attached to any Projects.
Manage collaborators
Team members / collaborators associated with the Ontology are managed in the Team pane of the Ontology's options.
Add collaborators
- Click the Invite collaborators button to add users to the Ontology.
A dialog appears.

- Type the email address of the user(s) you want to add, and select the role you want to give these users.

- Click Add to add these users to the Ontology.
Change collaborator role
To change the role of a collaborator on the Ontology, click the dropdown and select the role you want to a apply to the user.
- Users with the Admin role can modify the Ontology
- Users with the Viewer role cannot make changes to the Ontology. However Viewer can copy the Ontology.
Note
An Admin cannot be reverted to a Viewer. To revoke Admin access for a user, contact [email protected].

Delete collaborators
Delete collaborators by clicking the ![]() icon next to a user's name.
icon next to a user's name.
Object primitives
Object primitives (formerly called Skeleton templates) are customizable Ontology class.
To create an object primitive:
Object primitives are created in the Object primitives section of the Settings tab of an Ontology. Here you define a configuration of key points, and the vertices between them.

- A. 'Add a primitive': Start creating a new object primitive template.
- B. 'Names hidden': Show or hide the vertex names in the canvas.
- C. 'Add a point': Add more points on the canvas. Points are added to the list of points as they are made.
- D. 'Add an edge': Add more edges. Mouseover the first point and click once before clicking over the
end point of the edge. Edges are added to the list of edges as they are created. - E. 'Move/edit': Move vertices. Mouseover the vertex you wish to move. Click and drag to move the target vertex to the new desired location.
- F. 'Save current state': Save the template. If you exit the editor screen without saving all your work will be lost.
- G. 'Name': Enter a name for this object primitive. This name will be displayed in the ontology structure object annotation type selection.
- H. 'Delete template': Delete this object primitive. Please ensure you've removed this object primitives from
all connected objects before deleting, or the ontology structure may enter an unstable state. - I. 'Points': List of points with their coordinates and names. Coordinates are defined as (0, 0) in the
upper left. You can also add points using the + Add a point button at the bottom of the list. - J. 'Edges': List of edges. You can also add edges by using the + Add an edge button at the bottom of the list.
- Click Add a primitive (A).
- Give your primitive a meaningful name.
- Click Add. You are now ready to set up your primitive.
- Click Add a point (C). Add as many points as you need.
- Click Add an edge (D). Connect your points as needed.
- Click Save current state (F) to save your primitive.
To use your object primitive:
Return to the Structure tab of your Ontology. Your object primitive is available for selection when adding a new Ontology object. Once selected and saved, the object primitive is available within the label editor.
Linked Projects
The Linked projects pane shows a list of Projects using the Ontology. You can jump to any of the projects displayed by clicking the View link.
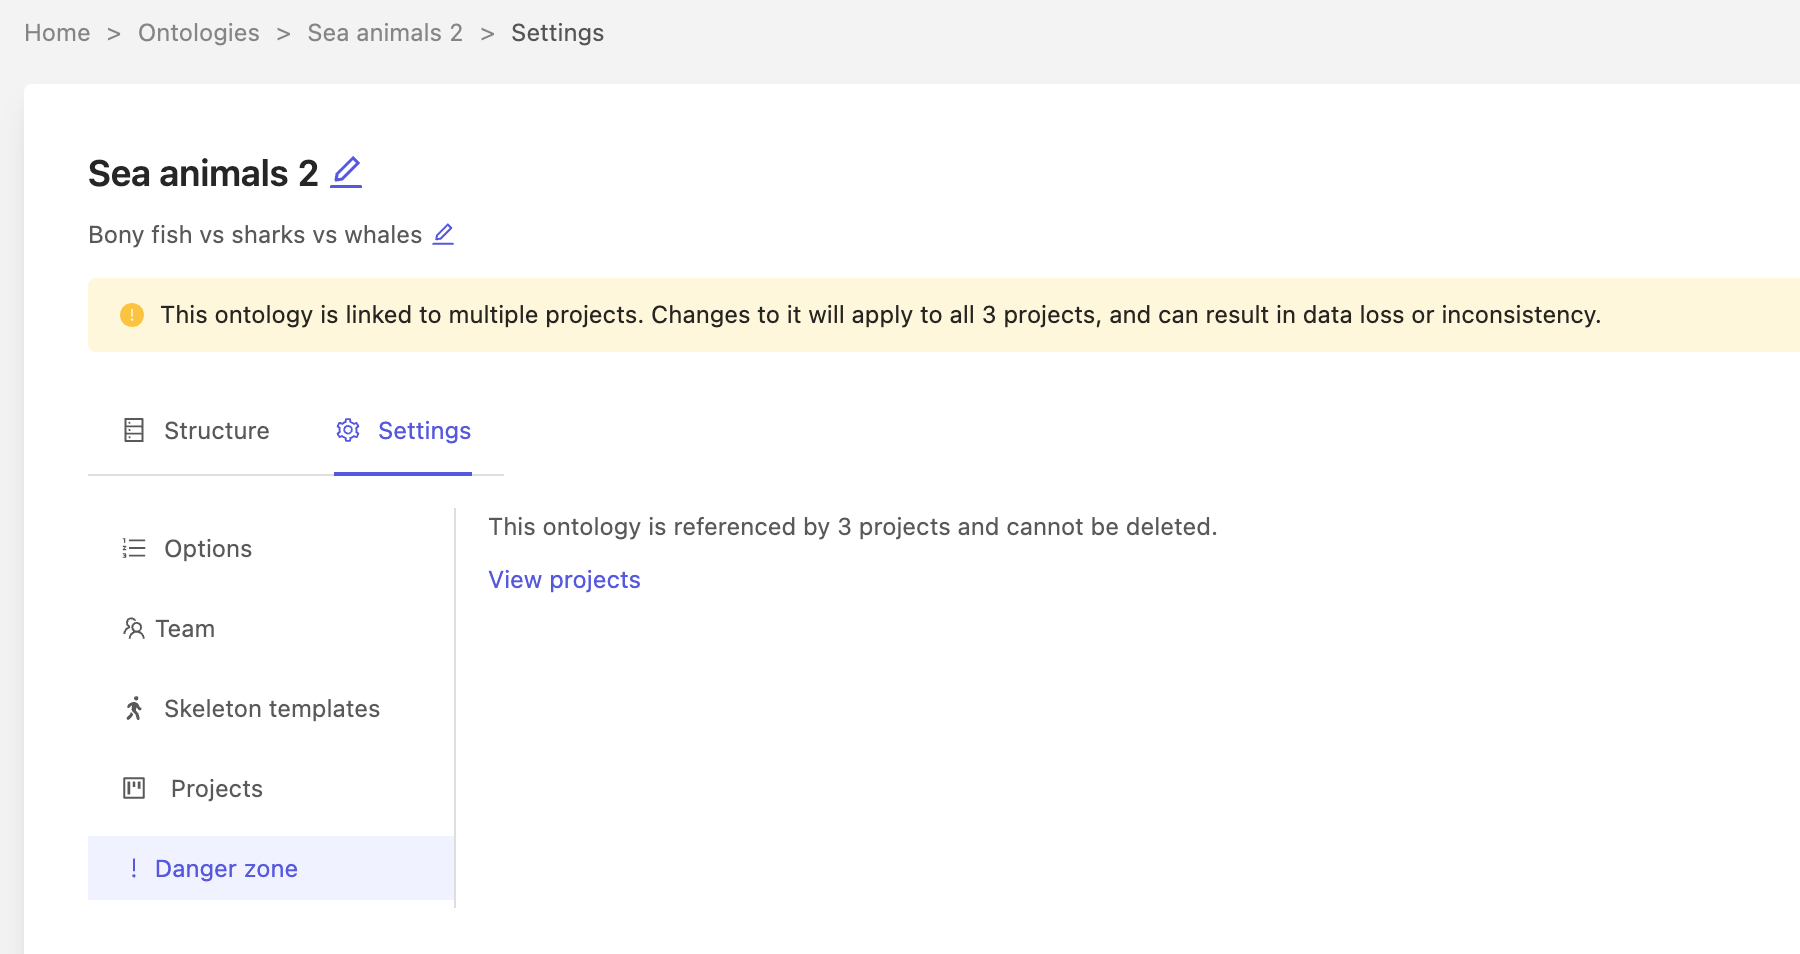
Delete Ontology
Use the Danger zone pane to delete an Ontology.
Note
Ontologies that are attached to one or more Project cannot be deleted. To delete an Ontology, it has to be removed from all Projects it's attached to.
Caution
Note that deletion is a permanent action, and deleted Ontologies cannot be restored.
Updated about 2 months ago