AWS S3
Watch our video tutorial on creating AWS S3 integrations, or follow the step-by-step guide below for even more details!
Video Tutorial - Creating an AWS integration
CRITICAL INFORMATION
Create an S3 bucket to store your files if you have not done so already. The S3 bucket must have STS available and enabled.
- Set your bucket permissions to block all public access.
- Ensure that the Storage Class of all files is set to 'S3 Standard'.
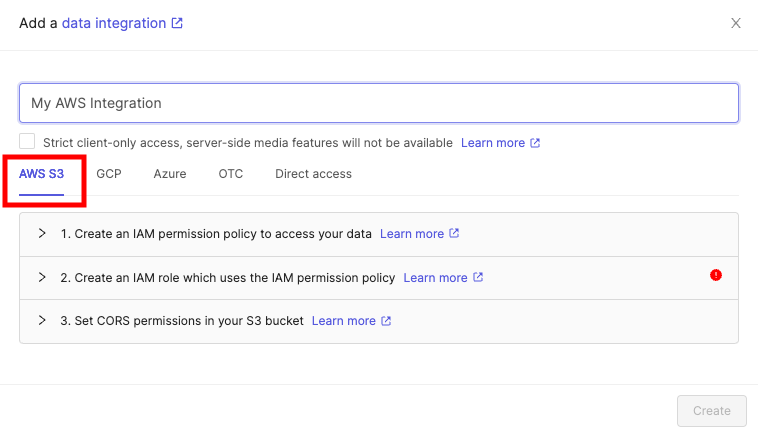
In the Integrations section of the Encord platform click Add integration to create a new integration.

Select AWS S3 at the top of the chooser.
Caution
Do not close this tab or window until you have finished the whole integration process. We advise opening AWS in a separate tab.
In order to integrate with AWS S3, you will need to:
- Create a permission policy for your resources that will allow appropriate access to Encord.
- Create a role for Encord and attach the policy so that Encord can access those resources.
- Activate Cross-origin resource sharing which allows Encord to access those resources from a web browser.
- Test the integration to make sure it works.
1. Create a permission policy
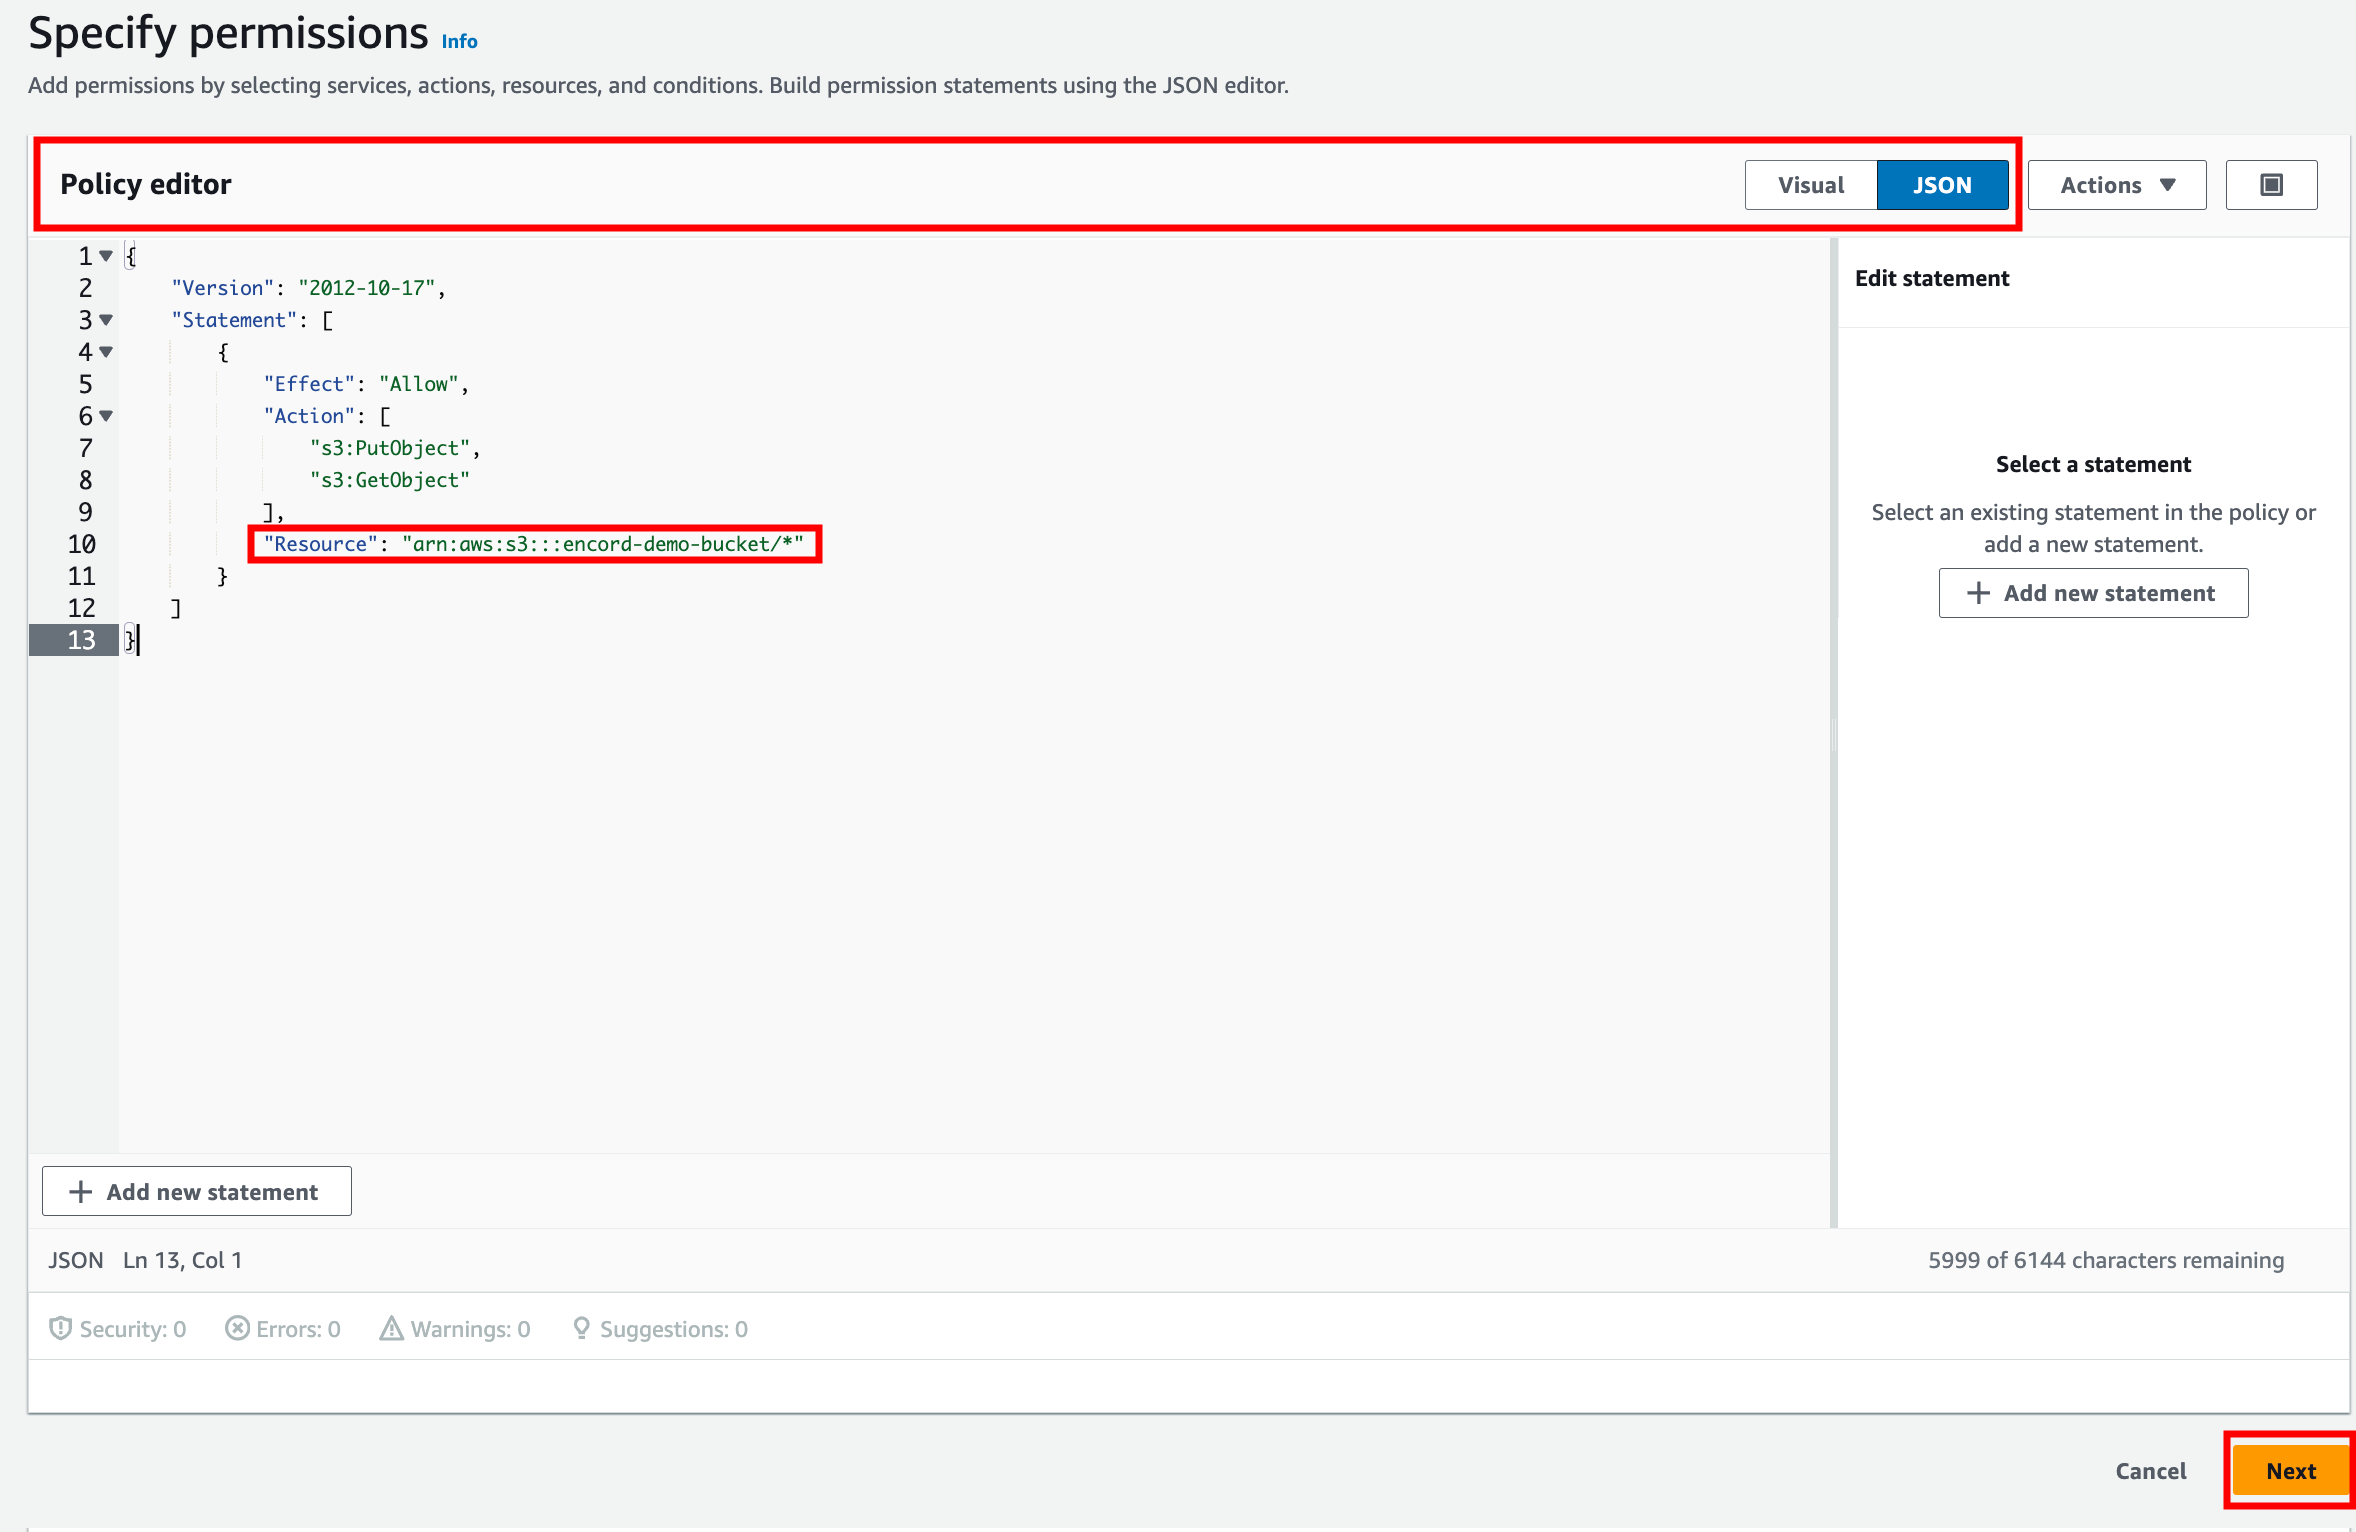
Log in to your AWS account. Navigate to Identity and Access Management (IAM) and select Policies. Click Create policy.

In Encord, copy the JSON from Step 1 of the integration.

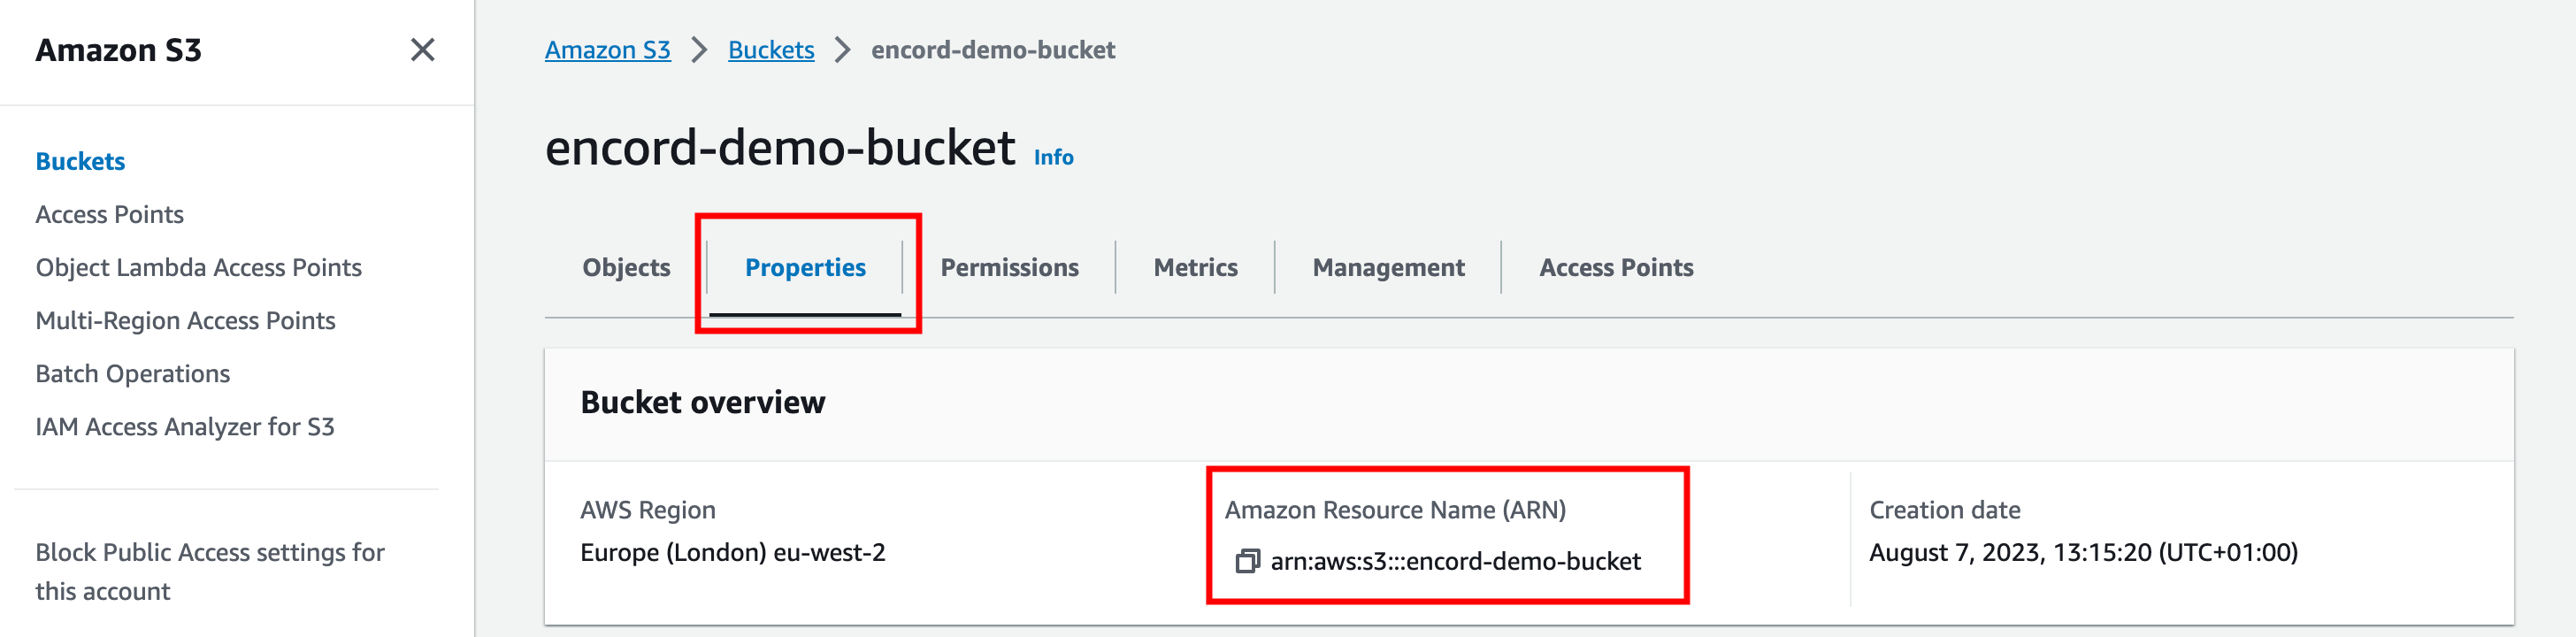
Navigate back to AWS and select JSON as the Policy editor. Paste the JSON you copied from Encord into the Policy editor, replacing the arn:aws:s3YourBucket value for Resource with your bucket's Amazon Resource Name (ARN). The ARN can be found in the Properties tab of your S3 bucket. Click the Next button.
Note
If you don't plan on using features that require write permissions, such as re-encoding data and creating image sequences,
s3:PutObjectcan be omitted.
Caution
When pasting your bucket ARN into the JSON policy editor, ensure that the Resource value ends in
/*.
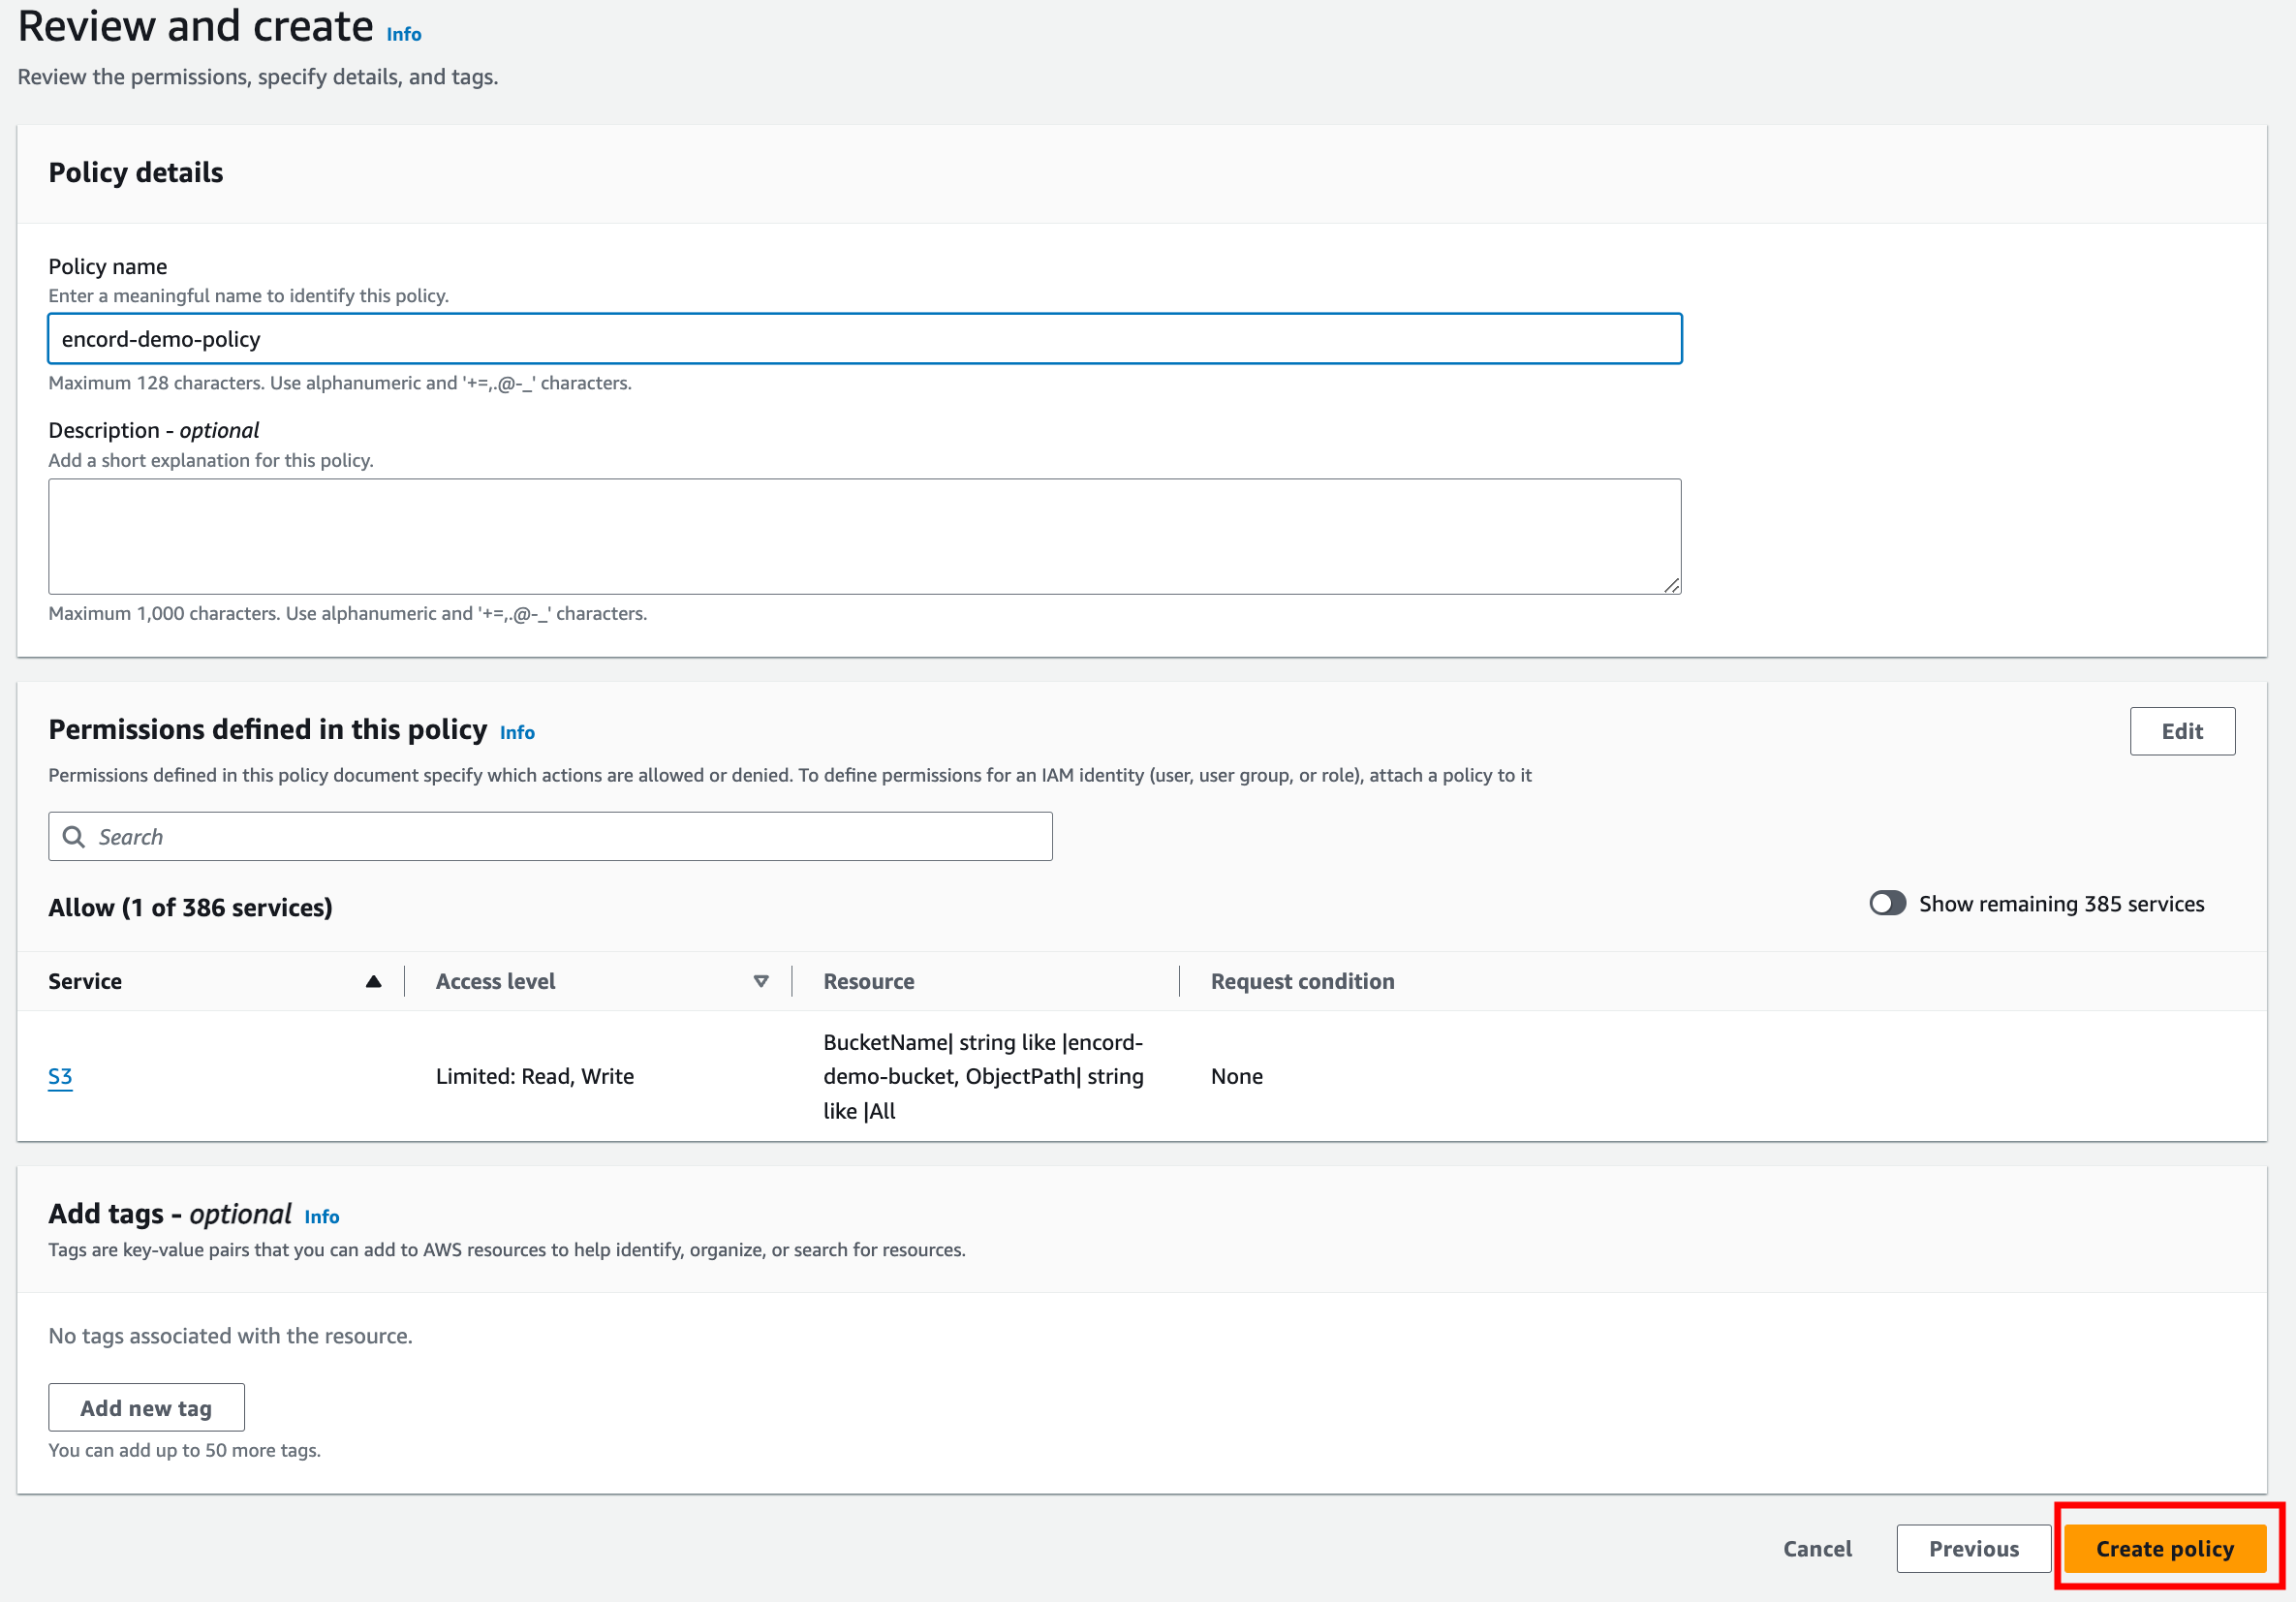
Add any tags according to your organization's resource tagging policy, and give your policy a descriptive name (we will use it in the next step). Click Create policy to finish creating your policy.
2. Create a role for Encord
In AWS, navigate to Roles and click the Create role button.

For Trusted entity type select AWS Account and select Another AWS account in the An AWS Account section.

Navigate to Encord and copy the Encord AWS account ID from step 2 of integration (shown below), and paste it into the Account ID field in AWS (shown above). In AWS, check Require external ID under Options to reveal the External ID field.
Navigate back to Encord and click Generate and copy to copy an External ID.

Paste the External ID you generated into the External ID field and click Next

Select the policy we created in step 1 and click the Next button to attach it to the role.

Give your role a descriptive name and click the Create role button. Find, and click on the role you just created and copy the Role ARN.

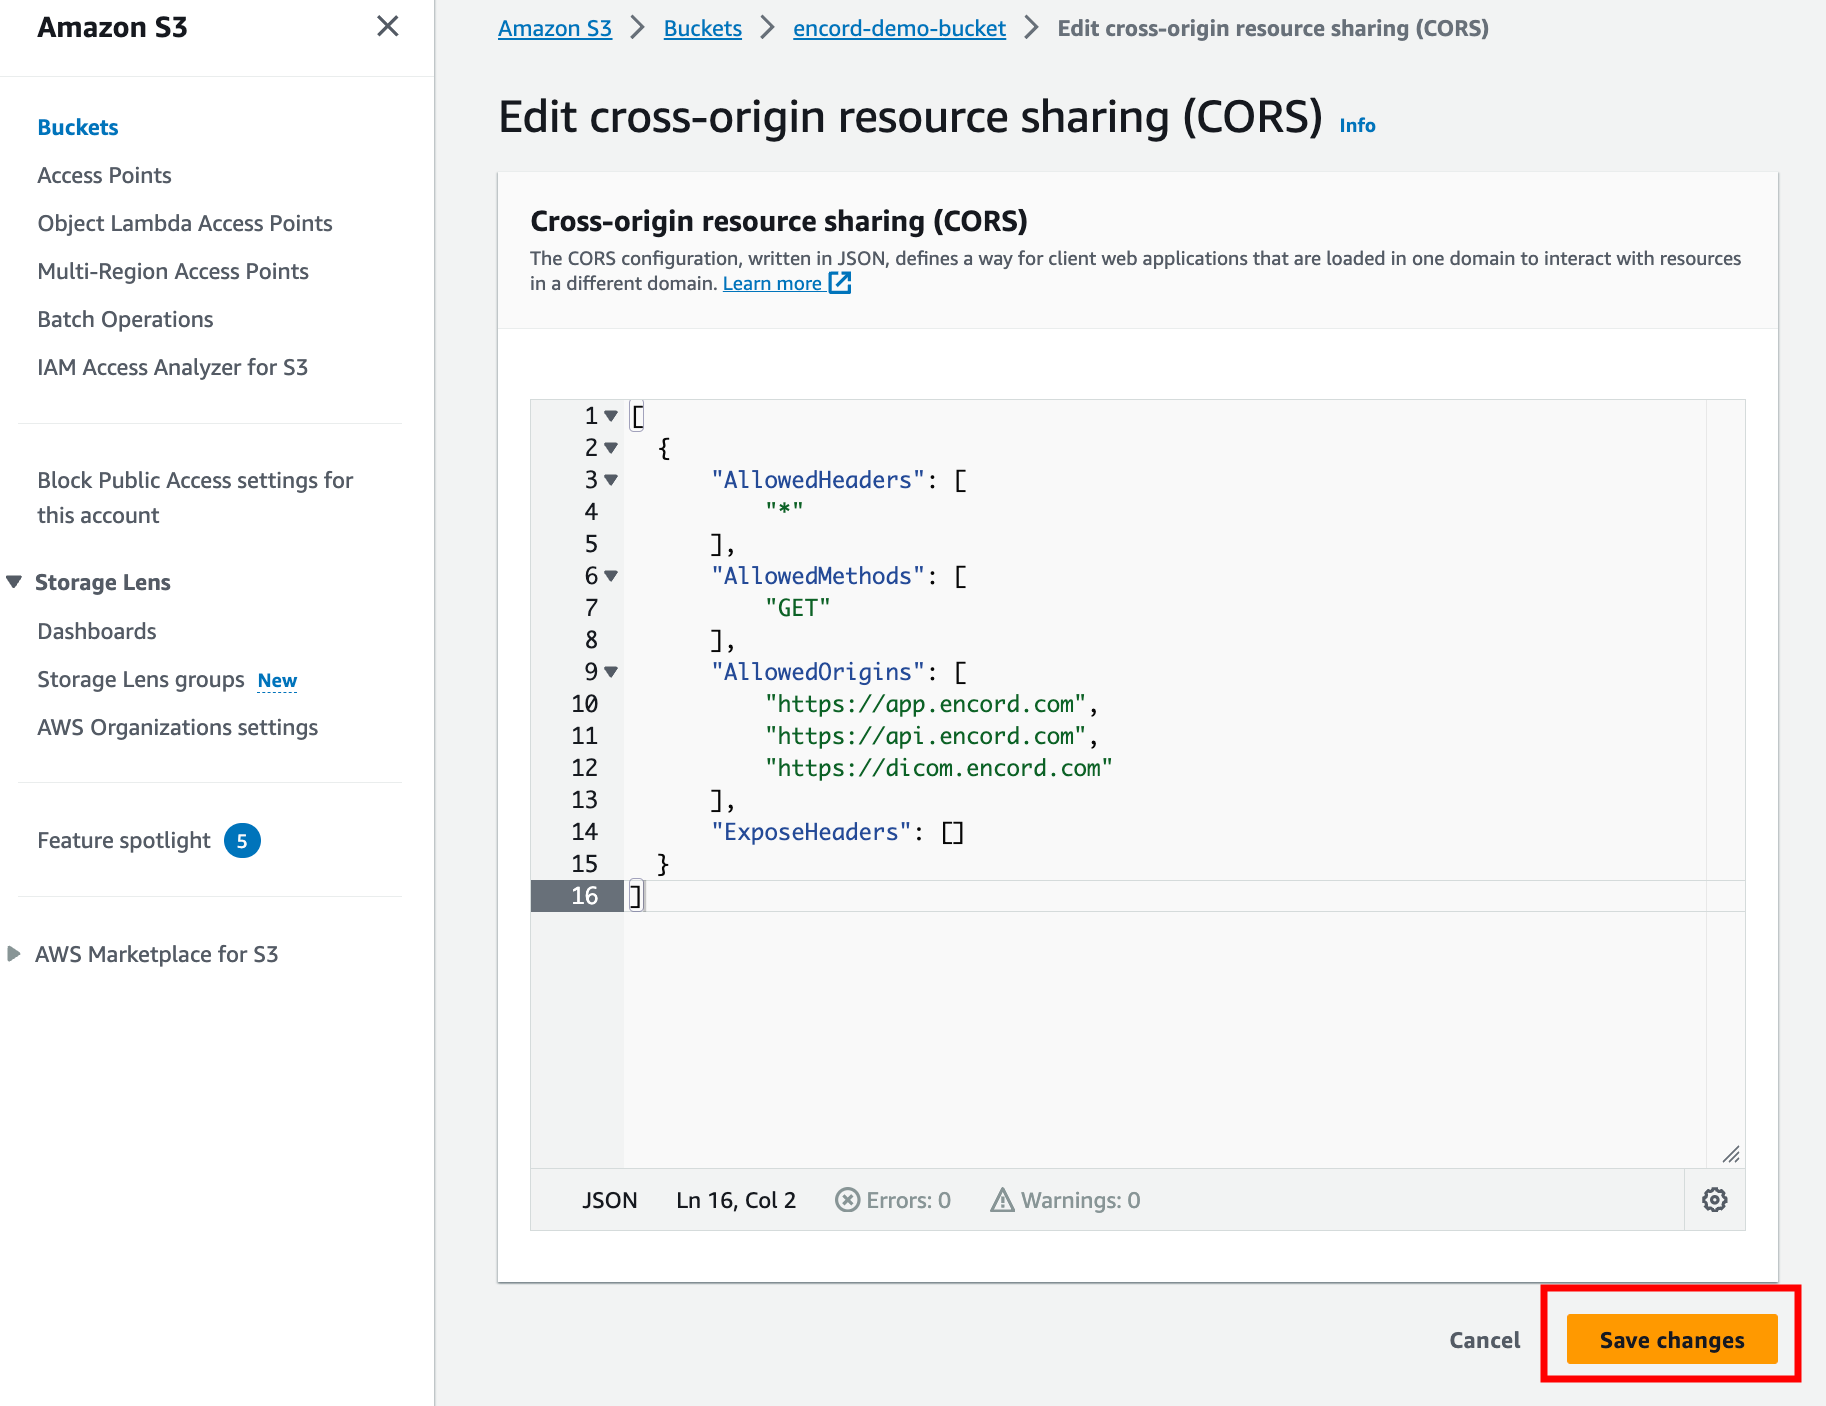
3. Allow Cross-origin resource sharing (CORS)
In Encord, expand step 3 of the integration. Copy the CORS JSON policy.

Navigate to the Permissions tab of your S3 bucket. Scroll to the bottom of the page and click Edit in the Cross-origin resource sharing (CORS) heading.
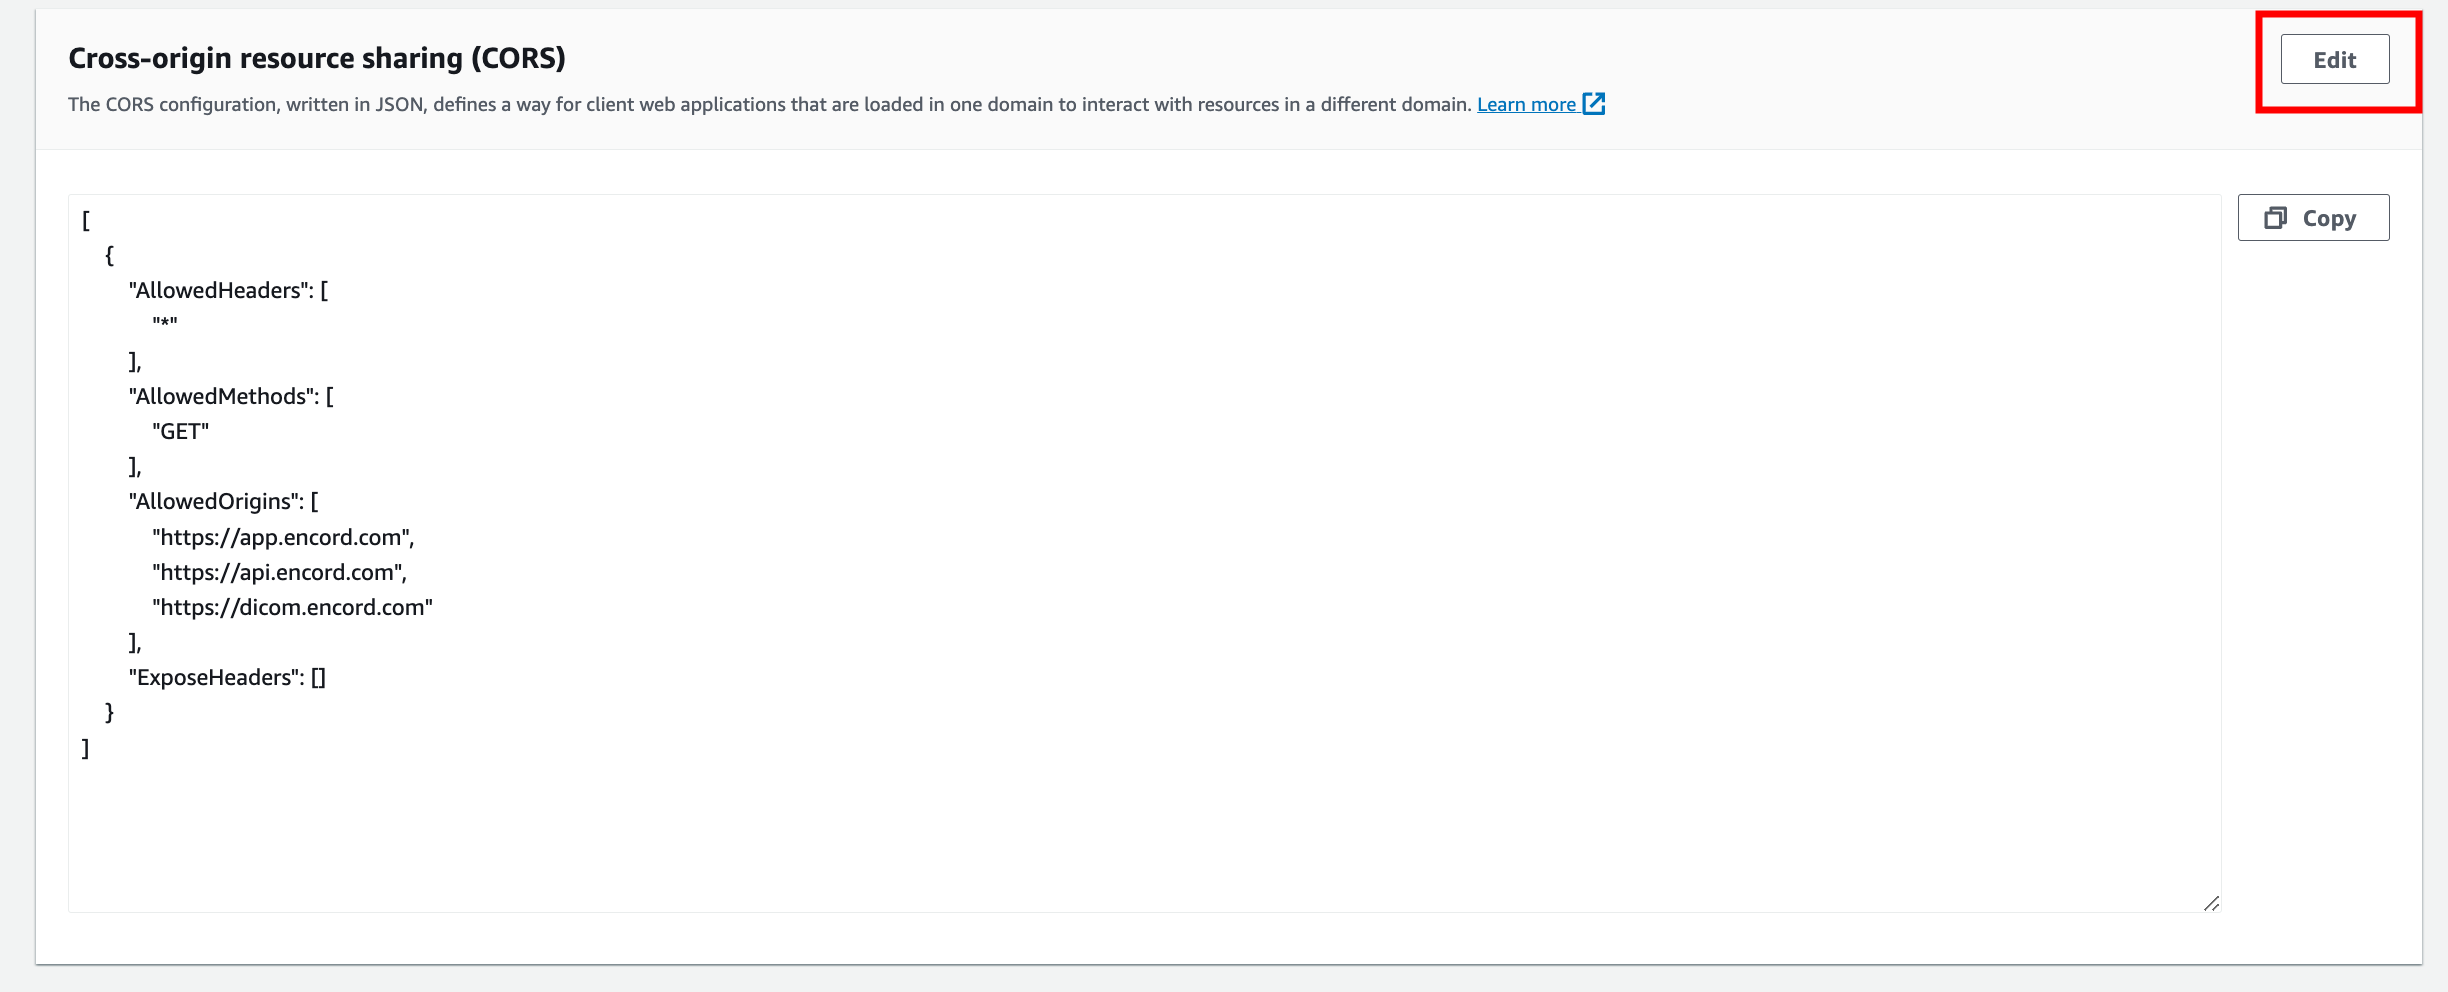
Paste the JSON into the editor that pops up. Click Save changes to finish settings up CORS.
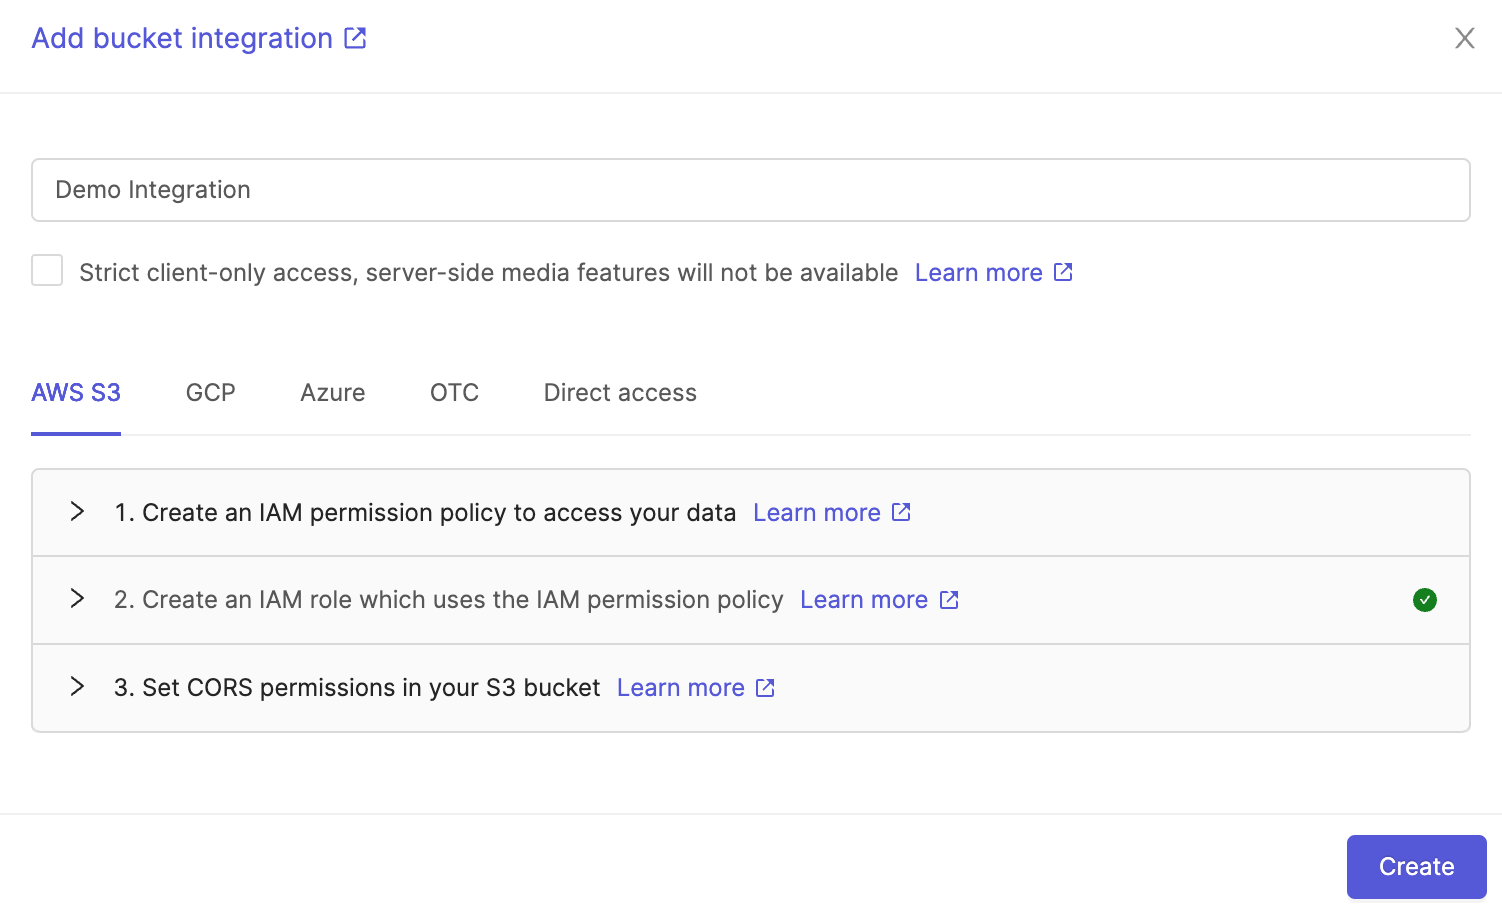
Navigate back to Encord and give your integration a name if you have not done so already. Click Create to create the integration you have just set up.
Tip
We have a few helpful scripts and examples to get you started creating datasets from your Amazon S3 bucket.
Caution
Due to the way AWS handles data, tests may fail when testing the integration. It can take up to 24 hours for the issue to resolve itself, after which the integration tests will pass, you can start labeling the data.
4. Test the integration
Click the Run a URL test button, on the integration, to test the integration.
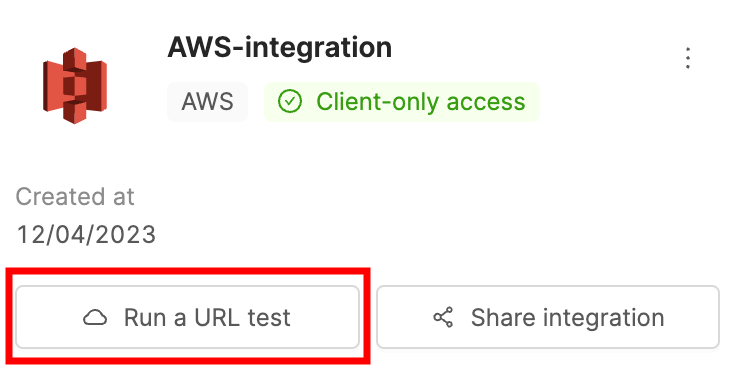
Paste the URL of any object in the bucket and click Check Encord can access this URL. If the test is successful a green tick appears next to Encord infrastructure and This machine.
Caution
Due to the way AWS handles data, both tests may fail for newly created AWS S3 buckets causing you to see the 'Something went wrong' message in the label editor when trying load data from that bucket. It can take up to 24 hours for the issue to resolve itself, after which you can start labeling.
Note
This test checks whether Encord is able to assume the role defined for it. It does not check that we can necessarily access your buckets. If the test passes but data on-boarding is still unsuccessful, verify that Encord has bucket permissions and that the object URLs are correct.
Creating a Dataset with AWS data
Tip
We recommend setting the expiration time for signed URLs to be greater than the time it takes to complete an annotation task.
Navigate to the private cloud integration page for guidance on how to create a dataset with data stored in AWS.
Create a Multi-Region Access Point integration
Using Multi-Region Access Points requires you to do a few things differently when setting up an AWS integration.
- When creating a permission policy for your multi-region access point in AWS, make sure to list the ARN of the Multi-Region Access Point, as well as the ARNs of all constituent buckets in the JSON.
Example JSON
{
    "Version": "2012-10-17",
    "Statement": [
        {
            "Effect": "Allow",
            "Action": [
                "s3:PutObject",
                "s3:GetObject"
            ],
            "Resource": [
                "Your-Multi-Access-Point-ARN/*",
                "Bucket-1-ARN/*",
                "Bucket-2-ARN/*",
                "Bucket-3-ARN/*"
            ]
        }
    ]
}
-
Make sure you create a CORS policy for every bucket that is included in your Multi-Region Access Point.
-
When uploading data to a dataset using the Multi-Region Access Point integration, make sure your JSON file is formatted correctly for use with a Multi-Region Access point - as documented here.
Performance enhancements
Caching can be enabled on the parent folder of the bucket containing the objects you want to label to improve the speed at which each video frame is displayed in the Label Editor. This is done by setting a cache-control header. Failing to set a cache-control header on all objects can lead to data loading slowly on our platform.
Terraforming your AWS S3 Integration
This guide is intended only as a supplement to the excellent Terraform documentation provided by Hashicorp here.
Please note, it needs to be performed in conjunction with the Encord App Integration setup steps described here
Please do not just copy and paste the below, instead, use it as a template for Terraforming your Private Cloud Integration.
To integrate with Encord, you will need to create:
- An S3 Bucket
- An IAM Policy
- An IAM Role
- A CORS Policy
Below are some examples of how this might look:
Declaring your Terraform providers
In the below example, we're using Hashicorp's AWS provider aws and the tfvars utility that allows us to neatly define values to pass into variables.
We also define an alias as well as a Region for the AWS provider, which needs to match the location in which you want your bucket to be provisioned.
terraform {
  required_providers {
    aws = {
      source  = "hashicorp/aws"
      version = "~> 5.1.0"
    }
    tfvars = {
      source  = "innovationnorway/tfvars"
      version = "0.0.1"
    }
  }
}

provider "aws" {
  alias  = "default"
  region = var.aws_region
}
Declaring your variables
In your variables.tf file, you will need to define the variables into which you want to pass values. An example is below:
variable "bucket_name" {
  description = "Name of the AWS S3 Bucket"
  type        = string
}

variable "policy_name" {
  description = "Name of the IAM Policy"
  type        = string
}

variable "role_name" {
  description = "Name of the IAM Role"
  type        = string
}

variable "external_aws_account_id" {
  description = "Account ID of the external AWS account you're connecting to - default value 312435012576 for Encord"
  type        = string
  default     = "312435012576"
}

variable "external_id" {
  description = "External account id - this is unique to your integration and can be found in the integration setup modal"
  type        = string
}

variable "aws_region" {
  description = "AWS Region in which bucket should be provisioned"
  type        = string
  default     = "eu-west-2"
}
Defining your variables in a .tfvars file to avoid having to manually edit the Terraform files
.tfvars file to avoid having to manually edit the Terraform filesSince we've opted to use tfvars we need to create a corresponding .tfvars file and specify some values we wish to pass into the variables you just defined:
bucket_name             = "encord-test-bucket"
policy_name             = "encord-test-policy"
role_name               = "encord-test-role"
external_aws_account_id = "312435012576"      # This is the same for every integration since it is Encord's AWS account ID
external_id             = "external-id" # This comes from the integration setup modal within the Encord application and is unique for each integration you set up
aws_region              = "eu-west-2"          # Change this to the appropriate region in which your bucket is to be created
Creating the required resources
The resources you need to create include:
- The AWS S3 bucket itself
- The AWS Bucket CORS Policy to allow Cross Origin Resource Sharing with the Encord domains
- The IAM Role
- The IAM Policy
- The IAM Policy attachment that binds the Role to the Policy
Defining the Bucket, Bucket ACL, and Bucket CORS Policy:
resource "aws_s3_bucket" "bucket_name" {
  bucket = var.bucket_name
}

resource "aws_s3_bucket_cors_configuration" "bucket_cors_policy" {
  bucket = var.bucket_name
  cors_rule {
    allowed_headers = [
      "*"
    ]

    allowed_methods = ["GET",
    "PUT"] # The PUT method here is not necessary unless you intend to re-encode videos or work with image groups

    allowed_origins = [
      "https://app.encord.com",
      "https://api.encord.com",
      "https://dicom.encord.com"
    ]
    max_age_seconds = 3600
  }
}
Defining the IAM Policy:
resource "aws_iam_policy" "encord-test-policy" {
  name        = var.policy_name
  path        = "/"
  description = "video testing S3 policy"
  policy      = <<POLICY
{
  "Version": "2012-10-17",
  "Statement": [
    {
      "Effect": "Allow",
      "Action": [
        "s3:PutObject",
        "s3:GetObject"
      ],
      "Resource": "${aws_s3_bucket.bucket_name.arn}/*"
    }
  ]
}
POLICY
}
resource "aws_iam_role" "encord-test-role" {
  name               = var.role_name
  path               = "/"
  assume_role_policy = <<POLICY
{
  "Version": "2012-10-17",
  "Statement": [
    {
      "Effect": "Allow",
      "Principal": {
        "AWS": "arn:aws:iam::${var.external_aws_account_id}:root"
      },
      "Action": "sts:AssumeRole",
      "Condition": {
        "StringEquals": {
          "sts:ExternalId": "${var.external_id}"
        }
      }
    }
  ]
}
POLICY
}
Attaching the Role to the Policy:
resource "aws_iam_policy_attachment" "encord-test-policy-policy-attachment" {
  policy_arn = aws_iam_policy.encord-test-policy.arn
  roles      = [var.role_name]
  name       = "${var.policy_name}-policy-attachment"
}
Before applying any changes, run terraform plan to preview the changes and check you are happy with them.
Once your Terraform has been applied, return to the Encord application, and test your integration.
The entire resources file s3-resources.tf now looks like this:
resource "aws_s3_bucket" "bucket_name" {
  bucket = var.bucket_name
}

resource "aws_s3_bucket_cors_configuration" "bucket_cors_policy" {
  bucket = var.bucket_name
  cors_rule {
    allowed_headers = [
      "*"
    ]

    allowed_methods = ["GET",
    "PUT"] # The PUT method here is not necessary unless you intend to re-encode videos or work with image groups

    allowed_origins = [
      "https://app.encord.com",
      "https://api.encord.com",
      "https://dicom.encord.com"
    ]
    max_age_seconds = 3600
  }
}


resource "aws_iam_policy" "encord-test-policy" {
  name        = var.policy_name
  path        = "/"
  description = "video testing S3 policy"
  policy      = <<POLICY
{
  "Version": "2012-10-17",
  "Statement": [
    {
      "Effect": "Allow",
      "Action": [
        "s3:PutObject",
        "s3:GetObject"
      ],
      "Resource": "${aws_s3_bucket.bucket_name.arn}/*"
    }
  ]
}
POLICY
}


resource "aws_iam_role" "encord-test-role" {
  name               = var.role_name
  path               = "/"
  assume_role_policy = <<POLICY
{
  "Version": "2012-10-17",
  "Statement": [
    {
      "Effect": "Allow",
      "Principal": {
        "AWS": "arn:aws:iam::${var.external_aws_account_id}:root"
      },
      "Action": "sts:AssumeRole",
      "Condition": {
        "StringEquals": {
          "sts:ExternalId": "${var.external_id}"
        }
      }
    }
  ]
}
POLICY
}


resource "aws_iam_policy_attachment" "encord-test-policy-policy-attachment" {
  policy_arn = aws_iam_policy.encord-test-policy.arn
  roles      = [var.role_name]
  name       = "${var.policy_name}-policy-attachment"
}
Updated 20 days ago