Encord Active does not only provide a streamlined method to currate your image data, Active also provides metrics and analytics to optimize your model's performance. Simply upload your model's predictions in to Active to start.
Your predictions must be imported to Active, before you can use the Predictions feature on the Explorer page and the Model Evaluation page.
STEP 1: Prepare Your Predictions for Import
CRITICAL INFORMATION
Disclaimer: We strongly recommend that you are knowledgeable about the
EncordSDK. If you are unfamiliar with the SDK or if you do not understand the following boilerplate code, refer to this topic in the SDK documentation.
Within Encord Active, predictions use the same format as labels. For the most part, creating predictions programmatically is the same as creating labels.
Note
If you want to learn more about working with labels, the content is available here.
⚠️ DO NOT SAVE the Label Row or your labels are overwritten by your predictions.
# Import dependencies
import os

from encord import EncordUserClient, Project
from encord.objects import LabelRowV2

# Authenticate client and identify project
ssh_private_key_path = os.getenv("ENCORD_CLIENT_SSH_PATH")
project_hash = os.getenv("ENCORD_PROJECT_HASH")

assert ssh_private_key_path is not None
assert project_hash is not None

client = EncordUserClient.create_with_ssh_private_key(ssh_private_key_path)

# Gets Project to add labels. This Project already exists in Encord.
project: Project = client.get_project(project_hash)

BATCH_SIZE = 100 # Batch size to split
label_rows = project.list_label_rows_v2()

# splits the label_rows into batches of size BATCH_SIZE
label_row_batches = [label_rows[i:i+BATCH_SIZE] for i in range(0, len(label_rows), BATCH_SIZE)]
serialized_output: list[dict] = []
for labels_batch in label_row_batches:


    bundle_init = project.create_bundle()
    for label_row in labels_batch:
        label_row.initialise_labels(bundle=bundle_init,# ignore existing labels
        include_object_feature_hashes=set(),
        include_classification_feature_hashes=set(),)

    # Execute bundle, initialising all the labels at once
    bundle_init.execute()

    # Import Predictions here by creating bounding boxes, and so on


    # Store the predictions as serialized json
    serialized_output.append(label_row.to_encord_dict())  # Serialize

import json
with open("predictions.json", "w") as f:
 json.dump(serialized_output, f)
Now that you have the predictions.json file, you can move to STEP 2 and import the JSON file into the Active UI.
STEP 2: Import Predictions Set
Once you have the predictions.json file from STEP 1, Prediction Sets can be imported from both the Model Evaluation page and the Upload predictions button ( + ) on the Overview tab of the Predictions page in the Explorer page.
CRITICAL INFORMATION
Encord Active supports importing Prediction Sets files of up to 100MB. If your Prediction Sets file exceeds 100MB, split the file into smaller files and then perform the import.
To import Prediction Sets into Active from the Model Evaluation page:
-
Contact Encord to get started with Encord Active.
-
Log in to the Encord platform.
The landing page for the Encord platform appears. -
Click Active in the main menu.
The landing page for Active appears. -
Click the Project.
The landing page for the Project appears with the Explorer tab selected. -
Click the Model Evaluation tab.
The Model Evaluation page appears.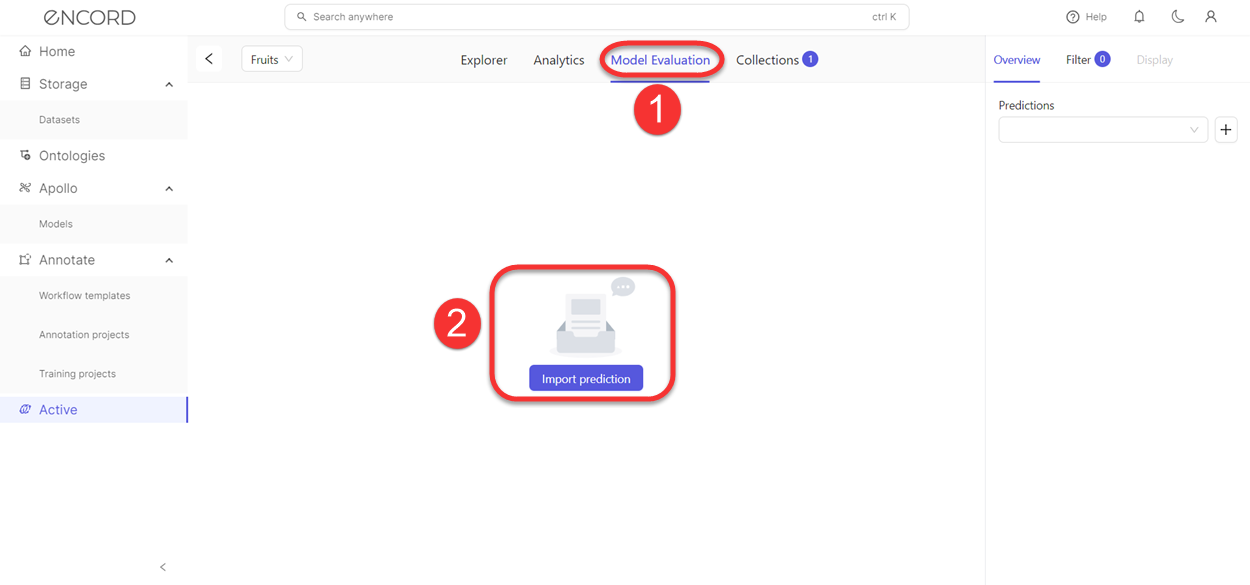
-
Click the Import prediction button.
The Upload predictions dialog appears. -
Type a meaningful name for the prediction.
-
Click the Select Predictions File button.
A dialog box appears. -
Select the JSON file to upload.
-
Click Open.
-
Click Start Upload.
Once the upload completes the Model Evaluation page and the Predictions page on the Explorer page are available for use.
Note
If you have any issues importing your predictions contact your CSM or contact us at [email protected].